

 When I was much younger, I didn’t need a sleeping bag, mat, or even a tent when camping. We would take off for the wilderness with only an Indian blanket, a canteen of water, a Zippo lighter, or box of matches and have a great time. Since I’ve grown older, I’ve learned to appreciate the things I didn’t need back then.
Temperatures in northwest Louisiana routinely reach the upper 90°s and low 100°s during the sunny days of summer. I’ve long been a fan of using solar energy to cook and power some of our phones and radios, so I decided to research and build a small evaporation cooler for camping, work, and around the house that will also run off solar power.
There are a lot of great articles and videos on the Internet showing several different styles of “bucket coolers.” After reading many articles and watching numerous videos on “Swamp Coolers” or “Bucket Coolers,” I settled on a design and began developing a parts list. It should be noted that I took advantage of the works others have done previously by using the same fan and pump observed because they have been proven effective in some of the videos and articles.
My parts list:
- 5-gallon plastic bucket with lid
- 4” 90° PVC
- 12 VDC water pump (Model 66039, from Harbor Freight)
- High-Speed Computer Case Fan
- SPST Switches (I purchased two from Radio Shack – your choice on which type you want to use)
- Project Box, small (Radio Shack)
- 1” L Brackets
- #6 screws, #6 flat washers, #6 lock washers, #6 nuts
- Filter material (minimum 24” X 36”)
- Window screen, black plastic (minimum 24” X 76”)
- Tubing (diameter to fit pump)
- T- fitting (diameter to fit tubing)
- Goop glue
- 4” dryer vent hose
- Cigarette lighter plug (male end)
Tools I used:
- Drill motor
- 2 – 2 1/8” hole saw
- Yardstick
- Razor knife
- Phillips head screwdriver
- Marker
- 5/32,” 3/16,” 15/32,” and ½,” drill bits
- Wire cutters
- Soldering iron
- Rosin Core Solder
- Tape Measure
- Electrical Tape
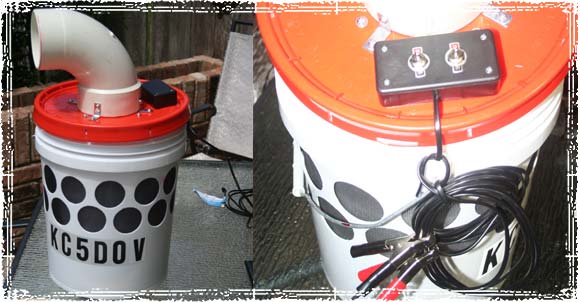
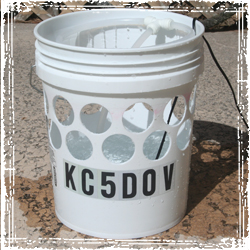 I began with a white 5-gallon bucket and lid from Home Depot. Two rows of 12 – 2 1/8” holes were drilled in the bucket, and the plastic burrs around each hole were removed. The holes are drilled around the top, leaving the bottom free for holding water.
 After drilling the 24 holes, a razor knife was used to de-bur the holes. Once all the holes were cleaned, a piece of window screen was cut to match the height and inside circumference of the bucket. The filter material was cut to the same dimensions. The pump was set in the bottom of the bucket and tubing cut to reach the top of the bucket.
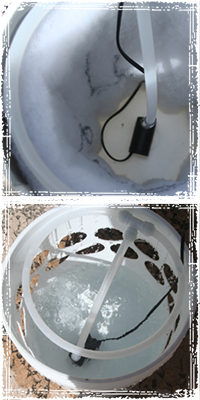
At the top, a T-connector was installed and a loop of tubing was measured and connected to the T. In the circle of tubing connected to the T, 3/32’ holes were drilled through the underside approximately every ¾” – 1” for water to flow down the filter. The screen and filter were removed, and approximately 2 ½ gallons of water were poured into the bucket, and the pump tested.
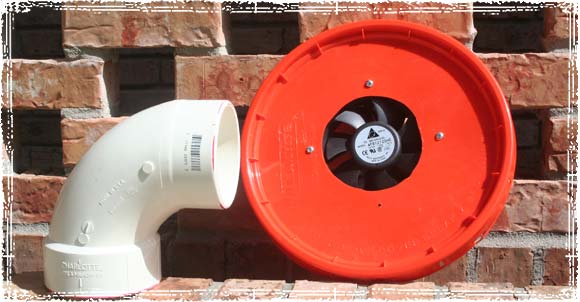
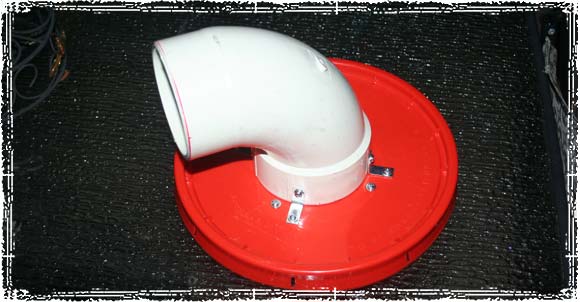
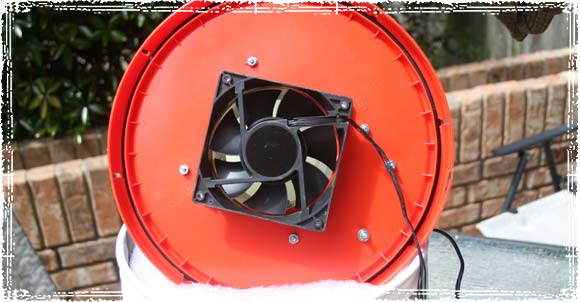
A hole, corresponding to inside diameter of the large end of the 90° PVC was cut into the lid. The fan was centered over the hole and connected to the lid with 4 – #6 screws, washers, and nuts. The 90° PVC was connected to the lid Using 4 – 1” L Brackets, screws, washers, lock washers, and nuts. A bead of GOOP put between the lid and PVC 90°, sealing it from any leakage of air. A dab of GOOP was also put on each screw and nut on the bottom of the lid to prevent them from loosening from the slight vibration of the pump and fan. On the lid of the plastic Project Box, two equally spaced and centered holes were drilled for the switches (I used 2 with on-off tags).
 The switches were mounted to the top of the Project Box and then the Project Box was mounted to the lid behind the 90° PVC. A ½” hole was drilled through the box and lid. The pump and fan were wired to the switches with each connection being soldered. The power wires were connected to a longer wire with a fused cigarette lighter plug on the other end for use with our solar panels and deep cycle batteries.
The cooler works great on hot days. It works better with lower humidity but still cools the air on humid days enough to be an asset when camping.
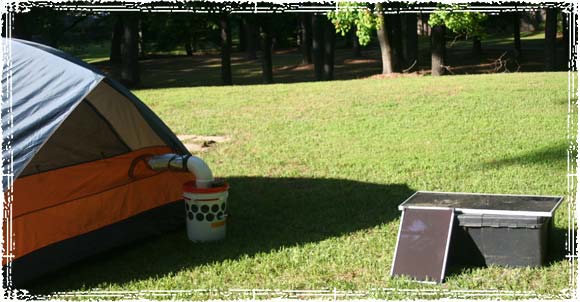
When camping, we run the cooler using a deep-cycle marine battery. A photovoltaic solar panel to charges the battery during the day. A standard dryer vent power cord installed hose directs or focuses the cooled air into our tent. If it gets too chilly in the tent a night, we can switch off the water flow and still have air circulation.
This particular set-up runs very quietly.
After running the fan and pump together it was observed that two (2) wraps of window screen are needed to keep water from running out the 24 holes as it drips down the filter material. Also, if used to cool a tent, the bucket cooler needs to be outside the tent, and there needs to be a vent or opening in the tent opposite from where the cooled air enters to prevent condensation from forming. A good point to remember is if you keep the deep cycle Marine battery connected to a solar charger or trickle charger, the water needs to be checked regularly to prevent a dry cell for forming.

I spent two or three nights reading, watching videos, thinking about how to make a cooler, and a little over three nights building and testing. Since the cooler will be used on a daily basis in the summer in my truck (for work), camping, and poolside, I decided to beef-up some areas. The 90° PVC fitting was connected with “L” brackets and sealed with GOOP glue ensuring now air leaks around the nozzle. All connections were soldered and taped with a quality electrical tape. The holes in the project box were sealed with the GOOP Glue. And don’t forget there are 24 – 2” or larger holes in the top of the bucket so it has lost a lot of structural strength and will not hold up much weight bearing down on the lid.
I also added 2 SPST switches to allow the pump to be turned on first, wetting the filter material. The other switch controls the fan. If it gets too chilly at night the pump can be shut off, leaving the fan on and the circulating air. The only change I foresee is changing the filter material to a more coarse material.
It’s not pure air conditioning, but it’s much better than just a fan blowing hot air, and we are more comfortable while we rough it.
Jim – KC5DOV
Note from OffGridSurvival: We would like to thank Jim for his extensive research and taking the time to provide this information for our readers.


Greetings,
This isn’t a reply but a question. And thank you mightily for your service and Sharing your ingenuity.I have a power source qustion. And please forgive my ignorance on the subject. Rather than a marine battery, could I use a 12 v/8 amp Potable power station (with solar panels charging it?) I appreciate any input and your kindness.
SG