

 When I was much younger, I didn’t need a sleeping bag, mat, or even a tent when camping. We would take off for the wilderness with only an Indian blanket, a canteen of water, a Zippo lighter, or box of matches and have a great time. Since I’ve grown older, I’ve learned to appreciate the things I didn’t need back then.
Temperatures in northwest Louisiana routinely reach the upper 90°s and low 100°s during the sunny days of summer. I’ve long been a fan of using solar energy to cook and power some of our phones and radios, so I decided to research and build a small evaporation cooler for camping, work, and around the house that will also run off solar power.
There are a lot of great articles and videos on the Internet showing several different styles of “bucket coolers.” After reading many articles and watching numerous videos on “Swamp Coolers” or “Bucket Coolers,” I settled on a design and began developing a parts list. It should be noted that I took advantage of the works others have done previously by using the same fan and pump observed because they have been proven effective in some of the videos and articles.
My parts list:
- 5-gallon plastic bucket with lid
- 4” 90° PVC
- 12 VDC water pump (Model 66039, from Harbor Freight)
- High-Speed Computer Case Fan
- SPST Switches (I purchased two from Radio Shack – your choice on which type you want to use)
- Project Box, small (Radio Shack)
- 1” L Brackets
- #6 screws, #6 flat washers, #6 lock washers, #6 nuts
- Filter material (minimum 24” X 36”)
- Window screen, black plastic (minimum 24” X 76”)
- Tubing (diameter to fit pump)
- T- fitting (diameter to fit tubing)
- Goop glue
- 4” dryer vent hose
- Cigarette lighter plug (male end)
Tools I used:
- Drill motor
- 2 – 2 1/8” hole saw
- Yardstick
- Razor knife
- Phillips head screwdriver
- Marker
- 5/32,” 3/16,” 15/32,” and ½,” drill bits
- Wire cutters
- Soldering iron
- Rosin Core Solder
- Tape Measure
- Electrical Tape
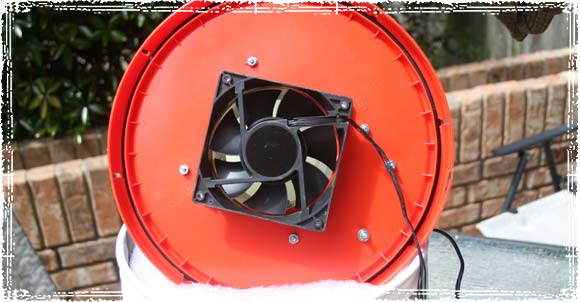
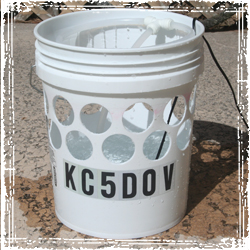 I began with a white 5-gallon bucket and lid from Home Depot. Two rows of 12 – 2 1/8” holes were drilled in the bucket, and the plastic burrs around each hole were removed. The holes are drilled around the top, leaving the bottom free for holding water.
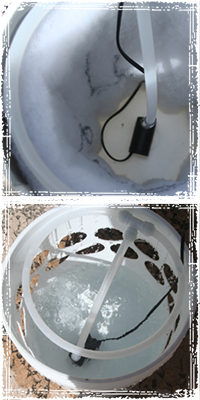 After drilling the 24 holes, a razor knife was used to de-bur the holes. Once all the holes were cleaned, a piece of window screen was cut to match the height and inside circumference of the bucket. The filter material was cut to the same dimensions. The pump was set in the bottom of the bucket and tubing cut to reach the top of the bucket.
At the top, a T-connector was installed and a loop of tubing was measured and connected to the T. In the circle of tubing connected to the T, 3/32’ holes were drilled through the underside approximately every ¾” – 1” for water to flow down the filter. The screen and filter were removed, and approximately 2 ½ gallons of water were poured into the bucket, and the pump tested.
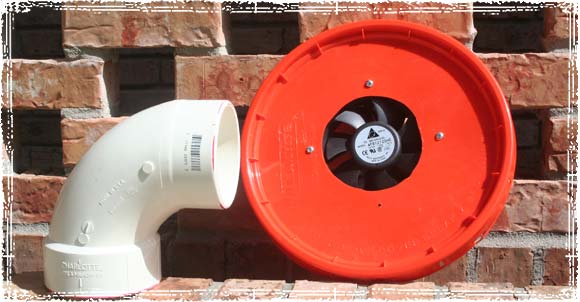
A hole, corresponding to inside diameter of the large end of the 90° PVC was cut into the lid. The fan was centered over the hole and connected to the lid with 4 – #6 screws, washers, and nuts. The 90° PVC was connected to the lid Using 4 – 1” L Brackets, screws, washers, lock washers, and nuts. A bead of GOOP put between the lid and PVC 90°, sealing it from any leakage of air. A dab of GOOP was also put on each screw and nut on the bottom of the lid to prevent them from loosening from the slight vibration of the pump and fan. On the lid of the plastic Project Box, two equally spaced and centered holes were drilled for the switches (I used 2 with on-off tags).
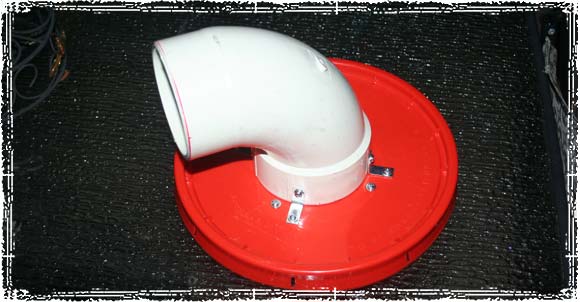
 The switches were mounted to the top of the Project Box and then the Project Box was mounted to the lid behind the 90° PVC. A ½” hole was drilled through the box and lid. The pump and fan were wired to the switches with each connection being soldered. The power wires were connected to a longer wire with a fused cigarette lighter plug on the other end for use with our solar panels and deep cycle batteries.
The cooler works great on hot days. It works better with lower humidity but still cools the air on humid days enough to be an asset when camping.
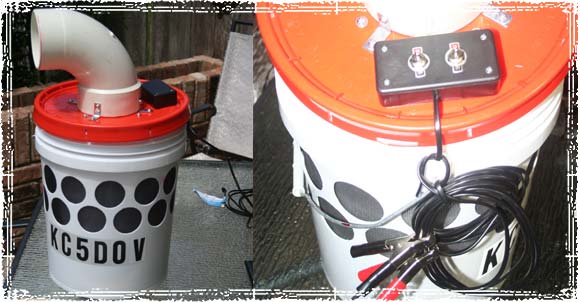
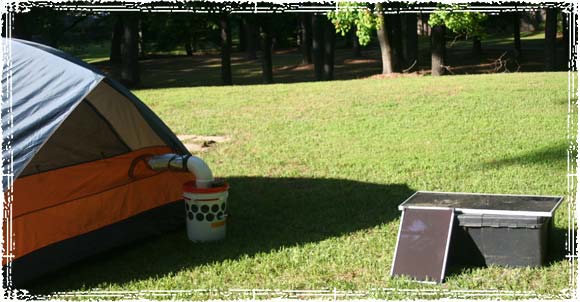
When camping, we run the cooler using a deep-cycle marine battery. A photovoltaic solar panel to charges the battery during the day. A standard dryer vent power cord installed hose directs or focuses the cooled air into our tent. If it gets too chilly in the tent a night, we can switch off the water flow and still have air circulation.
This particular set-up runs very quietly.
After running the fan and pump together it was observed that two (2) wraps of window screen are needed to keep water from running out the 24 holes as it drips down the filter material. Also, if used to cool a tent, the bucket cooler needs to be outside the tent, and there needs to be a vent or opening in the tent opposite from where the cooled air enters to prevent condensation from forming. A good point to remember is if you keep the deep cycle Marine battery connected to a solar charger or trickle charger, the water needs to be checked regularly to prevent a dry cell for forming.

I spent two or three nights reading, watching videos, thinking about how to make a cooler, and a little over three nights building and testing. Since the cooler will be used on a daily basis in the summer in my truck (for work), camping, and poolside, I decided to beef-up some areas. The 90° PVC fitting was connected with “L” brackets and sealed with GOOP glue ensuring now air leaks around the nozzle. All connections were soldered and taped with a quality electrical tape. The holes in the project box were sealed with the GOOP Glue. And don’t forget there are 24 – 2” or larger holes in the top of the bucket so it has lost a lot of structural strength and will not hold up much weight bearing down on the lid.
I also added 2 SPST switches to allow the pump to be turned on first, wetting the filter material. The other switch controls the fan. If it gets too chilly at night the pump can be shut off, leaving the fan on and the circulating air. The only change I foresee is changing the filter material to a more coarse material.
It’s not pure air conditioning, but it’s much better than just a fan blowing hot air, and we are more comfortable while we rough it.
Jim – KC5DOV
Note from OffGridSurvival: We would like to thank Jim for his extensive research and taking the time to provide this information for our readers.


This is a pretty good idea!
Jim I live in Shreveport if your near can you help me build mine? I’m ADHD and have trouble following even simple direction but I’m not lazy, you mentioned NW La. So I’m hoping.
No mosquitos – there is a screen where the air enters the bucket.
Excellent evaporation cooler, just be sure to put both the cooler and the solar panel in direct sunlight. Sunshine is needed to evaporate the water in the cooler and make the air cool. Obviously, sunshine is also needed to make electricity with solar panel which is clearly shown in the pics.
Great Idea – I will build one this weekend and try it out.
What if you sit a gallon jug of frozen water in the bottom of the bucket then filled with water?
We used a 1-liter Dr. Pepper bottle that was filled with H2O and frozen It helped cool the air. We did learn that the higher the humidity, the less cooling effect it has on the air. Fortunately, the humidity was not too high on our last camping expedition.
I used a 100+ qt. cooler. 12′ of dryer hose in it with one end open at the side of the cooler, and the P.V.C. 90 coming out the top. Covered with dry Ice. lasted most of a week.
Wait! You’ve got that half right! Solar panel (obviously) needs direct sunlight. However, you do NOT want the cooler in the sun. The cooling effect of the air is a well known phenomena, and you can look it up by searching for “wet bulb temperature”. Based on the relative humidity, you can get a certain temperature difference. The cooler the water is that’s evaporating, the colder the air coming off will be (wet bulb temperature). Heating it up with the sun will indeed increase evaporation, but it will also reduce your cooling temp. Put that little baby in the shade! Think of it this way: you just got dumped in a creek with all of your clothes on. You have to wear them to dry off. Would you rather that it be in the shade at 40deg F on a fall day, or would you rather be in the direct sun on a 90deg F in the summer? You’ll get dry either way, but the surface temp will be very different.
May God help and bless the vets on this day.Had to say that first. Very smart idea! Very smart. You all may know about this one too . Back in the 1800,s Folks would cool there cabins by putting up cheese cloth over there windows with a flower box under the window filled with water and the bottom of the chesse cloth would be in the water. as the wind blew the wet cheese cloth nailed to each window would cool the air inside and being cheese cloth they could still see out.May God bless us all
I’ve often wondered why more lessons learned from the past aren’t applied in today’s world.
Our forbearers often accomplished much the same as we set out to do far more simply. It’s information such as you presented which is truly invaluable. What household doesn’t keep on hand cheesecloth!
Very cool idea. So simple AND cheap. My Rellys had a cooler box, mounted in Kitchen window for chilling through evaporation, on similar principle.
Instead of drilling 24 – 2″ holes, you could painstakingly cut Hexagons. If situated correctly this would maintain much of the structural integrity lost.
Give me some insight on how to cut the hexagon shaped holes and I might incorporate them on a larger version this summer.
Jim (kc5dov@hotmail.com)
The easiest way would be to stencil the honeycomb design, leaving about a half inch to an inch space in between and cut it out with a dremel tool.
Congratulation!
Peter, HA4WU
Rotozip.
Pardon me for asking,but why would he want to take the time to cut out Hexagons? He does not have that much weight on the top? It is a great idea just the way he made it.
I think its a great idea as is. But, for hexagons, maybe a dremel would work fine!?
This sounds like a good idea. I’m going to try it to cool my car since I have to sit in it for hours at a time during surveillance.
To Larry: Just don,t forget it is outside your car. It just may blow your surveillance as you drive off with it out. Also I too remember surveillance work from back in the 80,s Is it boring or what! if you get to cool before you know it your be ZZZzzzzzz. Take care.
What size/model are the solar panels? Where did you purchase them?
I got them at Harbor Freight. The large panel is 15-watts and the smaller panel is 5-watts.
the large 15 watt solar panel, what is the largest electrical/appliance will it power. can they be hooked together. in tandem
Good idea,but if you buried pipes,pvc pipes in the ground you can get both cooled and “heated” air depending on climate.Like 30 foot long 4″ pipes.
Simple and durable.
could you start out with a full bucket of ice? and just run the fan at first till it melts?
Yes, but you would need to use only enough ice that when melted would not run out of the holes in the side of the bucket. A ballpark figure is that a gallon of water weighs approximately 8 pounds so about 16 pounds should be fine, but watch it carefully as it melts to see how high the water level gets.
The water won’t overflow. Water expands when frozen so it will occupy less space when it thaws.
The polar ice melting won’t submerge New York and the other coastal hellholes either. Pity, but that’s another story
I know what you mean. The whole crisis being rasied is dumb; We arent going to kill the world. We cant. Alls we can do is kill ourselves. Life will go on. Think this over; The meator impact that killed the dinosours exploded with the power of 150 millon hydrgen bombs. We dont have a thousanth of that. Finally, we are in the end of an ice age. The polar ice is melting, not because were here, but because thats what nature was up to. sure, we speed it up, but only an idot can think that 7 billion of somthing can touch the vastness of our planet. We dominate, sure, and our rule of idoioticy extends over much of the globe, but humanity is nothing but a fad. When mother nature wakes up from her nap, well, lets hope we made it to those nice, isolated bunkers in time.
BTW, Tilgar, a friend (Larry from the comment of June 3, 2014)has made one slightly different and uses frozen 16 – 20 oz. bottles of water in his.
I’m so trying trying this this next weekend.
It was difficult to find that fan on frozencpu.com with just the part/serial number. Here’s some help for anyone who’s going to build it: Delta 120 x 38mm High-Speed Fan – 190.48 CFM (AFB1212SHE-CF00)
Additionally, I’m having difficulty finding the water pump you used. Could you provide more information on it in order to find something similar? Amp, PSI, and fitting size seem important here.
This is the pump I’m using: 12 VDC water pump (Model 66039, from Harbor Freight. Good luck.
I’m considering this concept for a unit to sit in the bed of my pickup near the tailgate blowing into the cab’s rear window. Parking where the back half is in sunlight and the cab is in shade, what cooling effects this might generate for my dog for when we go for rides but she has to stay in the truck for very short and limited time frames, when I go in somewhere. (Before the lectures start… she doesn’t get out of the truck so I’ve always left both side windows half open [more than enough for her to put her head out] and the rear window open completely allowing her to get out of the cab into the bed if she wants as well as fresh water.) But still it’s worth experimenting with this design for this purpose.
Our little dog Benji didn’t take long finding the air vent blowing into our tent. We learned the following week after arriving home he was seriously ill, thus were really glad we had the cooler for his comfort. He stayed under the vent for two days on our last camping expedition.
Might consider using actual swamp cooler pads for this. They’re usually shredded aspen and could easily be put around the bucket’s interior. Don’t get the non-aspen ones as they don’t cool as effectively.
Also, this *will not* work well in a humid climate, since it depends on evaporation of the water.
It would take a little more time making, but if you angled your hole saw towards the bottom of the bucket after the pilot hole was through, you could just cut the top half of the circles out. Then cut straight across the center of the disc, leaving only a top half circle cut out. Then use a heat gun to soften and then pull the bottom half of the circle out so the water running down the inside wouldn’t leak out of the holes (even if the bucket was not on level ground)
Wouldn’t it just be easier to just plug in a regular solar powered fan?
heck yah… would even be easier still just to stay at home in front of the tv in my underwear with a bag of cheetos…. but I think you’re missing the point Jeanie
The ones I checked didn’t have the air moving power plus when the clouds came over the fan and pump slowed or stopped operating altogether. I would have loved to use individual solar panels for the pump and fan, but it didn’t prove feasible at this time. And for info purposes, we ran the cooler off our two panels (20-watt total) that were not in good sunlight )tree cover) for two days and when we charged the deep-cycle battery, it was only down to 67%.
This is a very creative yet obvious implementation of an evaporation cooler. Technically it is called a direct evaporative cooling or open circuit design ( the simplest – I do not mean this in a negative way – it is a perfect KISS [keep it simple] implementation). These coolers are used in many areas of the world. This technology goes back to ancient Egypt (i.e. well proven). It is not new or risky.
What makes this interesting is the material and innovative use of these techniques.
The most important thing to understand about this technology (and not mentioned in the article) is the author assumes you live in an area with low humidity.
Evaporative cooling is especially well suited for climates where the air is hot and humidity is low. In dry, arid climates, the installation and operating cost of an evaporative cooler (that is the technical term for this device) can be much lower than that of refrigerative air conditioning (a typical commercial freon air conditioner), often by 80% or so.
The simple rule of thumb is, if humidity (ever during hot weather seasons) goes above 50%, forget this technology and go with refrigerative air conditioning (if you really care or want to understand more, learn more about psychometrics).