

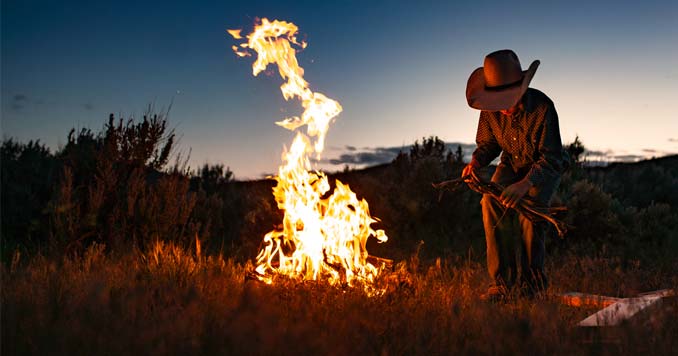
One of the most important skills for an outdoorsman or survivalist to master is the art of building fires.
Since the dawn of man, fire has played a vital role in our existence. From providing warmth and fending off wild beasts, to cooking food and giving comfort during those cold, dark, moonless wilderness nights, fire still plays a vital role in our survival – especially for those who still have that primal need to venture out into the wilderness.
Sitting next to the fire while camping out in the wilderness is a feeling that really can’t be put into words. For a lot of us, it seems to tap into some sort of primal instinct that inspires us to almost become one with nature. There’s just something about fire that satisfies some deep down desire that we often forget is even there. Sadly, our modern way of living has disconnected us from our past.
These days, the skills that were once second nature to our ancestors have become something that most people take for granted. While knowing how to start a fire may not be as important to today’s modern man, I think it’s something that everyone should know how to do.
In a wilderness survival situation, knowing how to build and maintain a fire is probably one of the most important survival skills you can have.
Fire Making is one of the oldest skills known to man; its importance can never be underestimated.
Why is fire building still an important survival skill?
There are numerous reasons that this skill should be part of your preparedness arsenal, including some of the following scenarios:
- On a routine pack trip, being able to build a fire and cook over a campfire eliminates the need to pack a stove and fuel.
- In inclement weather, a fire provides heat for warming yourself, preventing hypothermia, and drying clothes and equipment.
- In an emergency, a fire can alert rescuers to your presence and help them pinpoint your location.
- When you need to make sure your water source is pure, being able to build a fire allows you to boil and treat the water.
- Perhaps even more importantly, the dancing flames of a crackling campfire have a profound psychological effect on men, which can go a long way towards dispelling panic and boosting morale in a backwoods survival scenario or simply add a tasteful ambiance to an already enjoyable camping trip.
With so many applications both for routine recreation and in the event of an emergency, fire building is an indispensable skill. Yet in this modern age of microwaves and propane camp stoves, it is also a skill which is not as well understood or as widely practiced as it once was, and maybe in danger of becoming a lost art. In this article, we will first discuss the science of combustion and thermodynamics as it pertains to campfires and then delve into the various practical aspects of fire building.
Yes, there is a science behind building a fire!
In all likelihood, most seasoned outdoorsmen have mastered the art of building campfires without ever cracking open a textbook on chemistry or thermodynamics. However, an understanding of the natural laws that give rise to the phenomenon we know as “fire” can be invaluable to any student of outdoorsmanship looking to perfect his technique. Many of the ‘tricks of the trade’ that fire-builders of antiquity learned gradually by trial and experience become obvious when the science behind them is understood. Thus, before we discuss the art and practice of building campfires, let us first lay a foundation of scientific principles.
In chemistry, “combustion” is defined as a chemical reaction in which hydrocarbons break apart and combine with oxygen to form water vapor and carbon dioxide. For the purpose of this discussion, the term “hydrocarbon” refers to any molecule consisting of carbon atoms bonded to hydrogen or hydrogen and oxygen. It takes energy to break apart the molecules so the reaction can begin.
In chemistry, this is referred to as the “activation energy” of the reaction. However, when the carbon, hydrogen, and oxygen atoms recombine to form H2O and CO2, energy is released. In a typical combustion reaction, the energy released is greater than the activation energy, so the reaction is “exothermic,” meaning it gives off heat. The heat that it gives off can supply the required activation energy to other nearby hydrocarbons, allowing the reaction to become self-sustaining.
Wood is a composite material composed primarily of three chemical compounds: cellulose, hemicellulose, and lignin. All three of these compounds are combustible hydrocarbons. Thus, when wood is heated sufficiently in the presence of oxygen to supply the activation energy, it undergoes a combustion reaction. However, if not enough heat or oxygen is provided, the combustion may be incomplete. The products of the combustion reaction, water, and carbon dioxide are both invisible in the gaseous state, but condensing water vapor has the familiar appearance of white mist and particles of hydrocarbons that did not fully break down can take on any shade of gray or brown. Thus, a fire that produces significant visible smoke is a fire that is undergoing incomplete combustion. To correct this condition, it is necessary to increase its temperature, the availability of oxygen, or both.
Actually, in the case of a typical campfire, there is a strong connection between temperature and oxygen availability. Air is comprised of approximately 20% oxygen and 80% nitrogen (it also contains trace amounts of carbon dioxide, argon, and other substances, none of which are pertinent to the discussion of campfires).
The nitrogen is inert, meaning that it does not participate in the combustion reaction; only the oxygen is consumed in the reaction. However, since the two gasses are uniformly mixed, the availability of oxygen is directly proportional to the airflow through the fire. When a gas is heated without physical confinement it expands in direct proportion to the increase in its absolute temperature, causing its density to decrease. This generates a buoyant force that causes the hot gas to rise above surrounding cooler gasses. When air and combustion products are heated by a fire, they form a plume of hot gas that rises from the fire and thereby draws air from the surrounding environment into the fire.
The hotter the fire, the more the gasses expand. The more the gasses expand, the stronger the buoyant force. The stronger the buoyant force, the stronger the air current that it produces. Thus, the hotter the fire, the more air will be drawn through it, and the more oxygen will be available for combustion.
The temperature of fire depends primarily on the ratio of the heat released by the combustion reaction to the heat transferred from the fire to its surroundings. If more heat is lost to the surrounding environment than is generated by the combustion reaction, then the fire will quickly die out. If the combustion reaction produces more heat than is lost to the environment, then the fire will heat up. Thus, to better understand how to control the temperature of a campfire, it behooves us to consider the physical mechanisms by which a fire loses heat to its surroundings.
There are three mechanisms of heat transfer: conduction, convection, and radiation.
Conduction is the transfer of heat through the bulk of a solid material. The rate of heat transfer from one point to another by conduction is directly proportional to the temperature difference between the two points and inversely proportional to the distance between them. It is also directly proportional to the thermal conductivity of the material. In the case of a campfire, some heat is conducted away from the fire through the ground under and around the fire, but the thermal conductivity of rocks and dirt is quite low. As such, conduction is largely negligible in terms of its effect on campfires.
Convection is the transfer of heat due to the motion of a liquid or gas. As described above, the heat of a campfire produces a plume of hot gas which rises out of the fire and draws cooler air from the environment into the fire. This flow of air carries away heat, but it also supplies oxygen to the fire. As with convection, the rate of heat transfer by convection is directly proportional to the temperature difference between the fire and the surrounding air. The hotter the fire, the more heat will be carried away by convection, but the more oxygen will be supplied to the fire, promoting further combustion, which will replace the lost heat. Thus, these two effects tend to balance each other out, and in the case of a typical campfire, there is little that can be done to control convection anyway. Yet, if it cannot readily be controlled it can readily be harnessed, for example, by placing a frying pan or cooking pot in the hot plume of gasses, where it will be heated by convection.
Radiation is the transfer of heat through empty space or a transparent medium (such as air) by means of electromagnetic radiation. The radiant heat given off by a campfire is primarily in the infrared region of the electromagnetic spectrum, though obviously some visible light is given off as well. The rate at which heat is radiated by an object is proportional to its absolute temperature raised to the fourth power (that is to say, the temperature multiplied by itself four times). This means that as temperature increases, the rate of radiant heat transfer increases much faster than the rates of conduction and convection, which in turn makes it the most significant of the three mechanisms in terms of its effect on the equilibrium temperature of a fire. Moreover, of the three mechanisms, radiant heat transfer is the easiest to control in the case of a campfire. If a fire is built on flat, open ground, it will radiate heat freely to its surroundings. If a ring of thermally reflective material is placed around the fire, then much of the heat that would otherwise be lost to the environment will be reflected back into the fire, and the fire will burn hotter and cleaner.
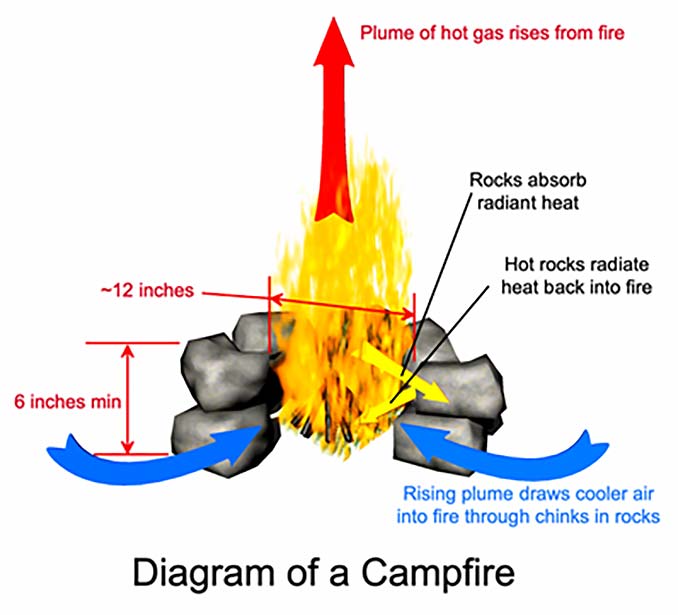
To summarize, the combustion reaction that we commonly refer to as “fire” requires hydrocarbons for fuel, heat to provide the activation energy necessary to start the reaction, and oxygen to sustain the reaction. In the case of a campfire, the hydrocarbon fuel consists of wood. Once the fire is lit, the heat released by the combustion furnishes the input heat necessary to sustain the reaction, provided that this heat is not lost to the environment. So, too, the oxygen necessary to sustain the reaction is provided by the flow of air that is drawn through the fire by natural convection which is driven by the heat of the fire. These concepts are illustrated in Figure 1. With this understanding of the scientific principles underlying the phenomenon known as fire, let us now turn our attention to the practical art of building campfires.
How to build a fire
The first step to building a fire is deciding where to build it and preparing the site if necessary. There are a number of factors that must be considered in making this decision. For safety’s sake, the fire must be sufficiently far removed from dry vegetation or other sources of fuel that it will not spread beyond its intended bounds. Proximity to caches of food, sources of water, or other areas of camp will contribute to considerations of convenience.
However, based on the overview of heat transfer presented above, another significant consideration is the thermal reflectivity of the site. Some materials reflect heat better than others; the percentage of thermal radiation that a material or surface absorbs (as opposed to reflects) is called its “emissivity.”
Polished metal has a low emissivity, and thus is a good reflector of heat, but polished metal is rarely encountered in the backcountry where campfires are typically built. The typical emissivity of most readily available materials such as dirt, rocks, and wood is more than 90%, meaning that, strictly speaking, these materials are poor reflectors. However, they are also poor conductors of heat, and so if they are placed in close proximity to the fire, the side facing the fire will rapidly heat up without conducting much heat away from the fire. As the surface facing the fire heats up, it starts to radiate heat back towards the fire, which accomplishes much the same thing as a good reflector would. As such, dirt and rock make good materials with which to enclose a fire.
How large does your fire need to be?
Another consideration that will influence where the fire is situated is how large it needs to be. As the size of a campfire is increased, the firewood on the outside begins to act as an enclosure for the central part of the fire, reducing heat loss to the environment, at least in proportion to the heat produced by combustion. As such, larger fires tend to burn hotter, making them easier to keep going and more difficult to extinguish. Of course, larger fires also require more fuel to maintain, which entails more work to gather the necessary firewood. The total heat radiated by the fire also increases with size (even though the fraction of the heat produced that is lost to the environment decreases), and so above a certain size the intensity of the heat in close proximity to the fire can become uncomfortable or even hazardous. This makes large fires impractical for cooking or other activities that require a person to remain in close proximity to the fire. In most cases, a campfire about 12 inches in diameter is ideal for camp cooking.
Thus, for a typical camp fire, a ring of stones measuring 12 inches across inside and at least 6 inches high makes an excellent enclosure. If built from rough rocks, the ring will usually have plenty of small gaps and chinks that allow air to flow into the fire. However, if mud or mortar is used as an aid in fitting the rocks together, then vent holes must be deliberately included to ensure the fire will be able to draw in an adequate supply of oxygen.
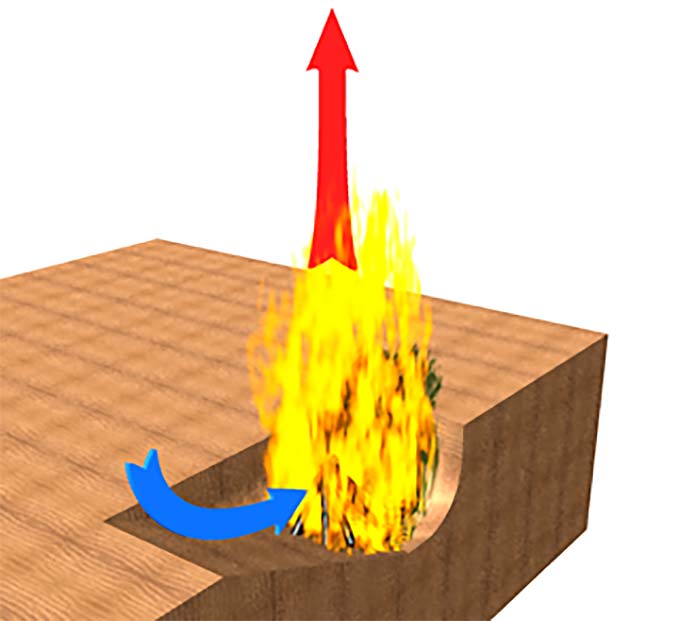
Similarly, digging a fire pit in lieu of building a ring of stones can result in a fire that is starved for oxygen. In this case, one solution is to dig the pit with one side gently sloping to facilitate the inflow of air and the other sides nearly vertical to provide the enclosure and prevent heat loss. This is illustrated in Figure 2.
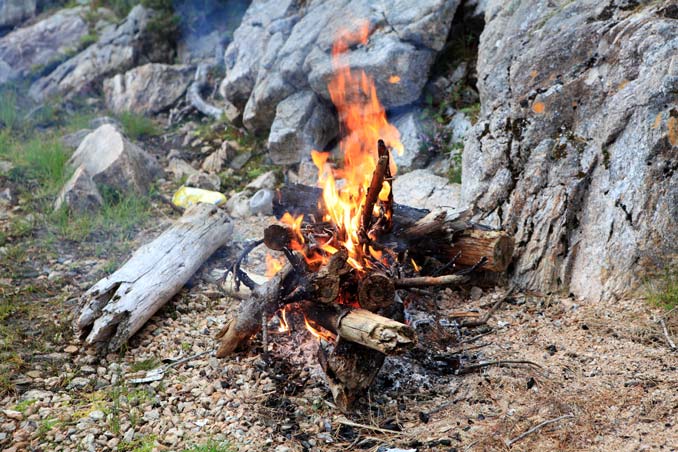
Sometimes on a mountain slope a suitable ‘fireplace’ can be made simply by prying a large rock out of the slope, setting up the rock on the downhill side of the hollow it had once occupied, perhaps flanked by a few smaller rocks to form a half-circle, and building the fire in the hollow from which the rock was pried. A photograph of one such fire is shown in Figure 3.
If adverse conditions such as rain or snow increase the difficulty of keeping a fire going, the fire is simply made larger than usual, or the enclosure made higher than usual; either or both of these measures can compensate for inclement weather.
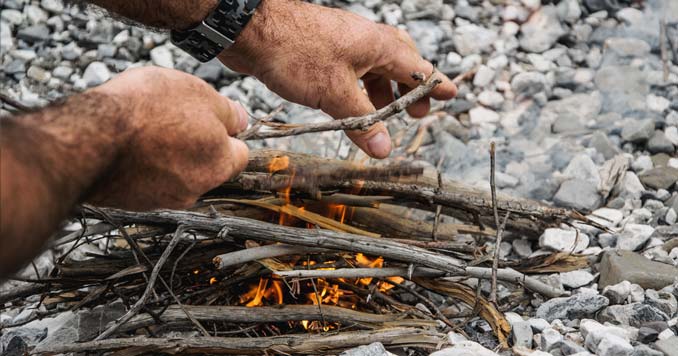
Once the location for the fire has been selected, and the enclosure prepared, fuel for the fire must be gathered. Recall that the combustion of wood is a chemical reaction between the hydrocarbons that make up the wood and oxygen in the air. As such, the reaction occurs primarily at the surface of the wood, where it is in contact with the air.
Consequently, if a piece of wood has a higher ratio of surface area to volume it will burn more rapidly, releasing more heat more quickly but also being consumed more quickly. Approximating a branch or log as a cylinder, it’s surface area increases in direct proportion to its diameter, while its volume increases in direct proportion to the square of its diameter (that is, the diameter multiplied by itself). Thus, as the diameter increases, the ratio of surface area to volume decreases.
This is why twigs and small branches burn rapidly while larger branches and logs burn more slowly. Smaller pieces of wood also require less activation energy to initiate combustion, making them easier to ignite. Thus, small twigs are used to start a fire, while larger branches are burned once the fire is giving off enough heat to ignite them. For a typical 12-inch fire, branches ranging from one to two inches in diameter provide an ideal fuel. As the size of the fire increases, so does the optimal size of the firewood used to feed it.
Different types of wood have subtly different burning characteristics.
For example, the sap of pine and certain other conifers is rich in flammable hydrocarbons which readily vaporize upon heating, and burn in the gas phase, furnishing a pine-wood fire with an abundance of bright orange flame (or an abundance of pungent blue or black smoke, if the fire is not hot enough or is starved for oxygen). Meanwhile, willow and cottonwood are low-density woods that lack the flammable resin present in pine and thus burn more quickly but with less heat and less flame.
The wood of sagebrush is so porous that when it is sufficiently dry, the combustion reaction is able to propagate throughout the branch instead of burning only on the visible surface. As such, dry sagebrush wood tends to burn with intense and remarkably constant heat output until it is completely consumed, at which point it turns to ash and disappears with surprising suddenness.
Since every species of wood has its own unique burning characteristics, and the most readily available species of firewood vary with climate and location, the outdoorsman is well advised to experiment with burning the various types of wood available to him so that he can put them to the best possible use when building fires.
Of course, one universal constant is that wood burns better when it is dry. Water boils at about 212 degrees Fahrenheit (lower atmospheric pressure at high elevations reduces the boiling temperature slightly, while salts or other compounds dissolved in the water may increase it slightly), and transforming water from a liquid to a gas requires a substantial input of heat. Since wood must be heated to temperatures considerably higher than 212 degrees in order to combust, any water that is present in the wood will boil off before the wood ignites, absorbing heat in the process. Thus, moisture in the wood has much the same effect as if the activation energy to ignite the wood were increased.
When placed in a sufficiently hot fire, wet wood will still dry out and then burn, but the more water is in the wood, the more heat it will take to get it to combust. Thus, it is preferable to gather firewood that is as dry as possible, and especially important for the wood with which the fire is started to be dry, as the newly lit fire will not yet be putting out enough heat to boil off much moisture.
In wet weather, finding dry wood is an art in and of itself. However, one reliable if rather laborious method consists of cutting up a large dead log, and splitting dry kindling from its interior. Since rain and melting snow rarely soak into solid wood to a depth of more than an inch, wood split from the inside of a log will generally be dry enough to get a fire going, and once the fire is burning with nominal intensity, wet wood can thereafter be laid thereon to first dry out and then combust.
With the fire site prepared and the firewood gathered, all that remains is to light the fire. This is typically done by first lighting a “fire starter” using a match, butane lighter, or another such ignition source. The fire starter is placed in the fire ring, and a handful of small, dry twigs or wood shavings is placed on top of it. The combustion of the fire starter ignites the twigs, and successively larger pieces of wood are placed thereon until the fire has been built up to the desired size.
Fire Starter: Natural and Commercial Fire Starters
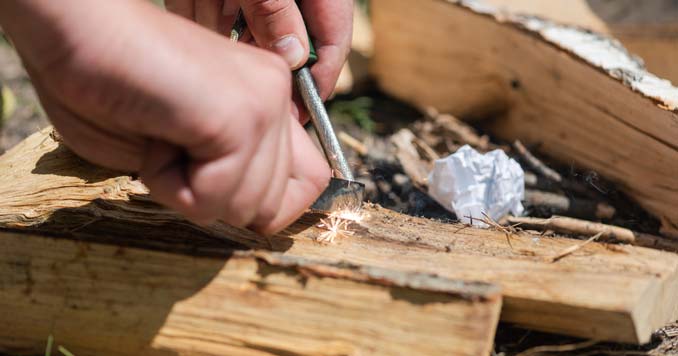
There are many types of fire starter. Some occur naturally, while others are manufactured. If sufficiently dry, pine twigs with their pine needles still attached make an excellent natural fire starter.
Handfuls of dry grass or lichen can be similarly used, again provided they are sufficiently dry. Of manufactured fire starters, crumpled or shredded newspaper is a traditional favorite that works well when dry but becomes useless if it gets damp. Wax paper burns better than newspaper and is less susceptible to moisture. Tar paper takes slightly more heat to ignite than wax paper, but it can still be ignited with a common butane lighter, and it is practically impervious to water.
There exist a plethora of products specifically marketed as fire starters in sporting goods stores, but discussion of these shall be reserved for their respective product reviews. As an emergency measure, a highway safety flare can be used as a fire starter. Safety flares are self-igniting and burn with an extremely intense blow-torch-like flame that typically lasts upwards of ten minutes. This provides ample heat to dry out and ignite a couple handfuls of sopping-wet half-inch-diameter twigs and even a few larger sticks, making it possible to get a fire going with no dry wood at all.
Primitive methods of Starting a Fire:
- 2 Man Hand Drill
- Starting a fire with a Fire Drill
- Fire starting with a Fire Plough
- How
to starts a Wilderness Fire with a Hand Drill
You should always have at least two methods of starting a fire with you at all times.
- Survival Lighters
- FireSteel
- Water Proof Matches
- Emergency Candles: Candles are a good way of getting damp tinder and wet wood to start. If you only have a few matches, use your match to light the candle first. A candle will last a lot longer than a match, and gives you more time to start a stubborn fire.
The art of building campfires has so many applications both in time of dire distress and in the course of recreation that it becomes an invaluable skill for the outdoorsman or survivalist. Its principles are rooted in the sciences of chemistry and thermodynamics, which have been summarized in this article. However, as with any art, fire building is a skill that can be perfected only by means of practice. Hopefully, the principles presented in this article will serve to guide the reader’s practice of this art as he hones his skills.


